![]()
General Router FAQ
PC Fixed IP Address

|
General Router FAQPC Fixed IP Address |
|
The easist/quickest method of configuring your PCs for TCP/IP access is to use the router's DHCP facility whereby the PC is allocated its IP address and DNS/Gateway settings automatically by the router (on Windows, this is set as 'Obtain IP address Automatically' in the network TCP/IP properties).
However, if you wish to set your own local IP addresses manually (for example to run a local server which needs a fixed local IP address) then you can. You can mix automatic (DHCP) and manually set IP addresses on the same network as long as the 'manually' set IP addresses do not clash with the DHCP range and that all addresses fall within the same subnet.
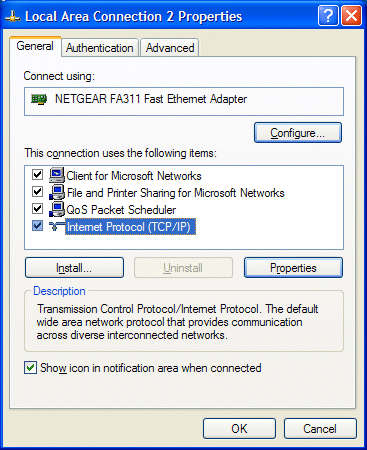
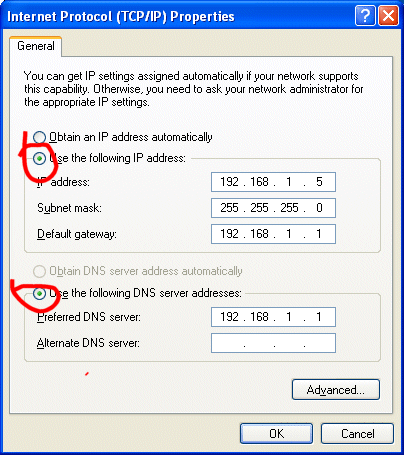
Select the TCP/IP protocol as shown below and click on 'properties' and then check that Manual selection of IP and DNS entries is selected. Enter your required settings as necessary. In this example we have chosen an IP address fot the PC as 192.168.1.5 - ensure any manually allocated PCs are given addresses outside your DHCP allocated range and that you don't use the same address twice.
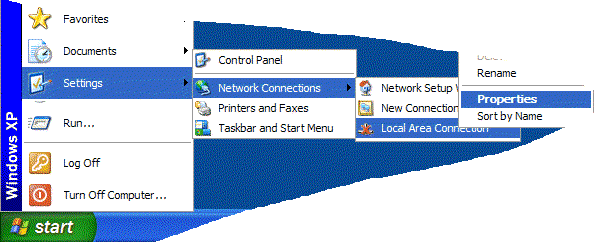
From Windows 98 Control Panel, go to Network and highlightTCP/IP -> Ethernet Adapter and click the Properties button. Go to the IP Address tab :
Let’s assume that we’ve chosen to number our local PC’s in the range 192.168.1.X where X is any number from 1 to 255 (that means our netmask will be 255.255.255.0 as only the last octet varies). In this example we’ve chosen this IP range because the router has a factory default address in that range (the router is numbered 192.168.1.1), but you can number your PCs within any range you wish, as long as you re-number the router to within the same range.
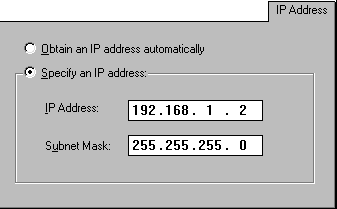
Click the Specify an IP address button as shown in the picture on the right, and give the PC a unique address (i.e. one not allocated to any other PC). If you were using Method 1, the button marked "obtain automatically" would be checked. In our example we’ve given the PC an IP address of 192.168.1.2 (remember that the router is already using 192.168.1.1 by default). You could number the next PC 192.168.1.3, or 192.168.1.155 etc., as long as the final octet (the bit after the 192.168.1.) is unique and in the range 1-255.
Next, click the DNS Configuration Tab, and enter your ISP’s DNS addresses. The picture below shows an example, but you must use those for your own ISP).
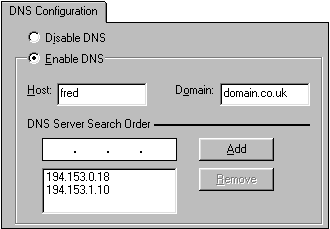
If you prefer (and we do recommend it) you can still use the Vigor router’s DNS proxy facility. To do this, instead of entering real DNS server addresses as shown above, enter the router’s local IP address (default 192.168.1.1 unless you have changed it). DHCP must be enabled on the router for the DNS proxy to be active but you can still manually configure the PC’s IP address.
Finally, you need to set the Gateway IP Address. The Gateway is the Router’s local IP address – default is 192.168.1.1 unless you have changed it. It is absolutely vital that you enter this !

NOTICE : This document is © SEG Communications and may not be distributed without specific written consent. Information and products subject to change at any time without notice.