


- Router,DrayOS 5
How to do Provisioning via Sampling from an Online Device
XV. VigorACS and VigorConnect
This guide explains how to create and apply a VigorACS provisioning profile by sampling the configuration from an online device.
Provisioning profiles are useful when deploying multiple CPEs with the same settings, or when applying a common configuration change across several devices, such as wireless settings, firewall rules, or other managed parameters.
VigorACS supports several provisioning methods, including XML files, CSV files, and sampling from an online device. This article covers the sampling method.
Creating a Global Parameter Profile
Log in to VigorACS and confirm that the required devices are visible in the system. From the menu on the left, select Provisioning, then open Global Parameters.
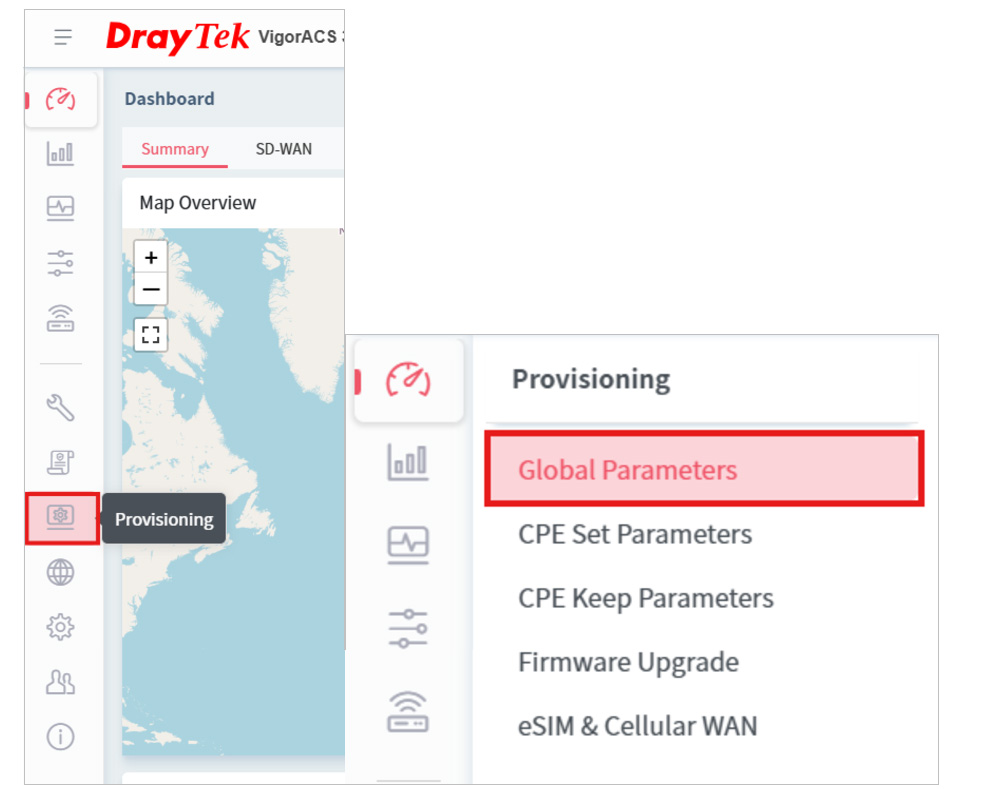
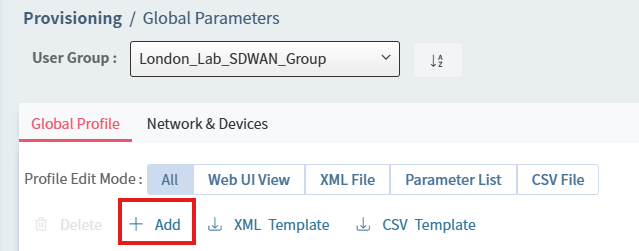
Click + Add to create a new provisioning profile.
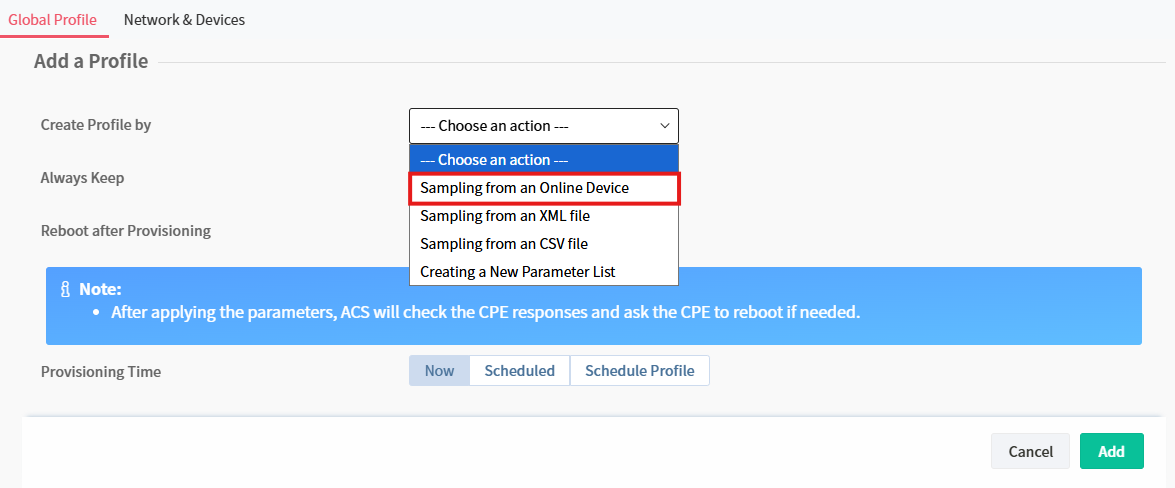
In the Add a Profile window, set Create Profile by to Sampling from an Online Device.
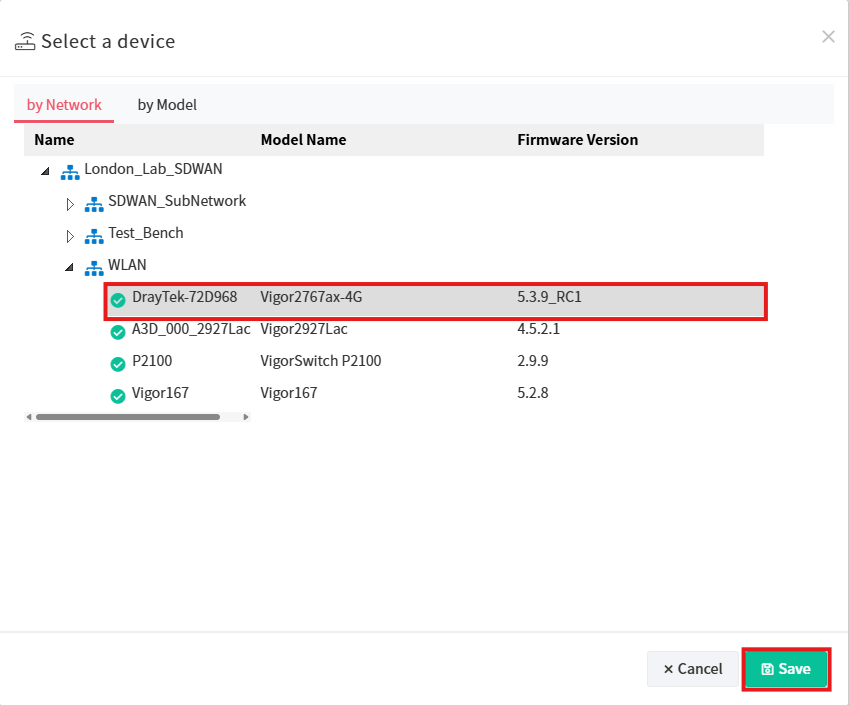
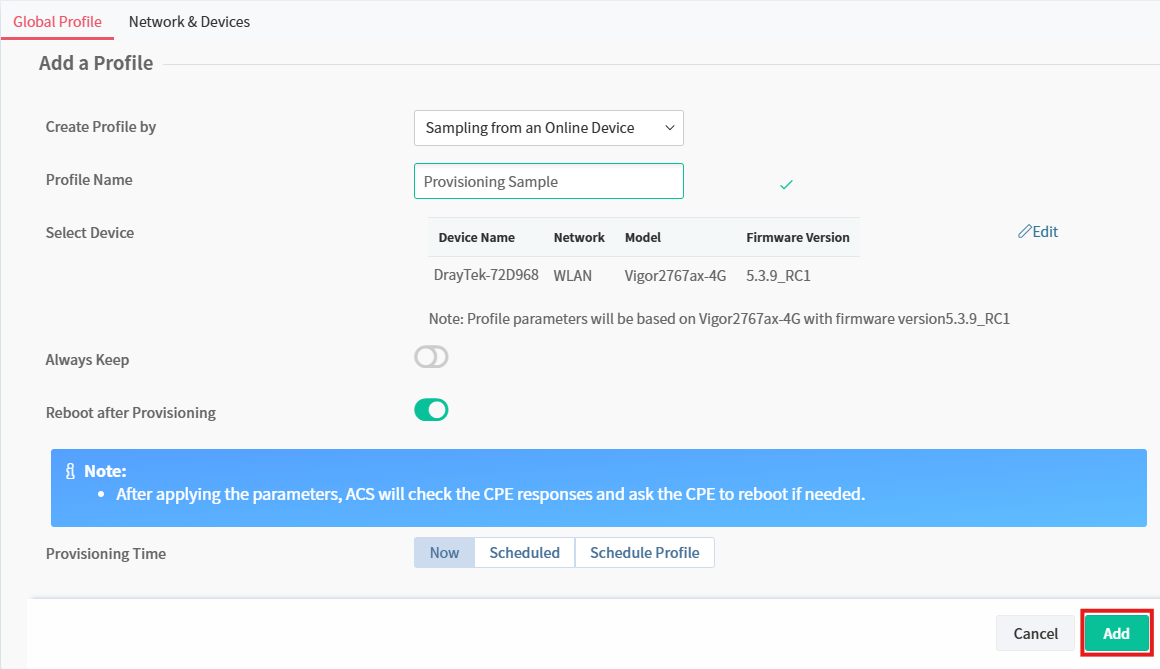
Enter a profile name, then click Edit next to Select Device to choose the device that VigorACS will sample. The profile options can also be configured at this stage:
- Always Keep keeps the selected parameters synchronised with the profile. If those settings are changed later on the router or in VigorACS, VigorACS can restore the profile values.
- Reboot after Provisioning allows the router to reboot after provisioning where required by the selected changes.
- Provisioning Time allows the profile to be applied immediately or scheduled for a later date and time.
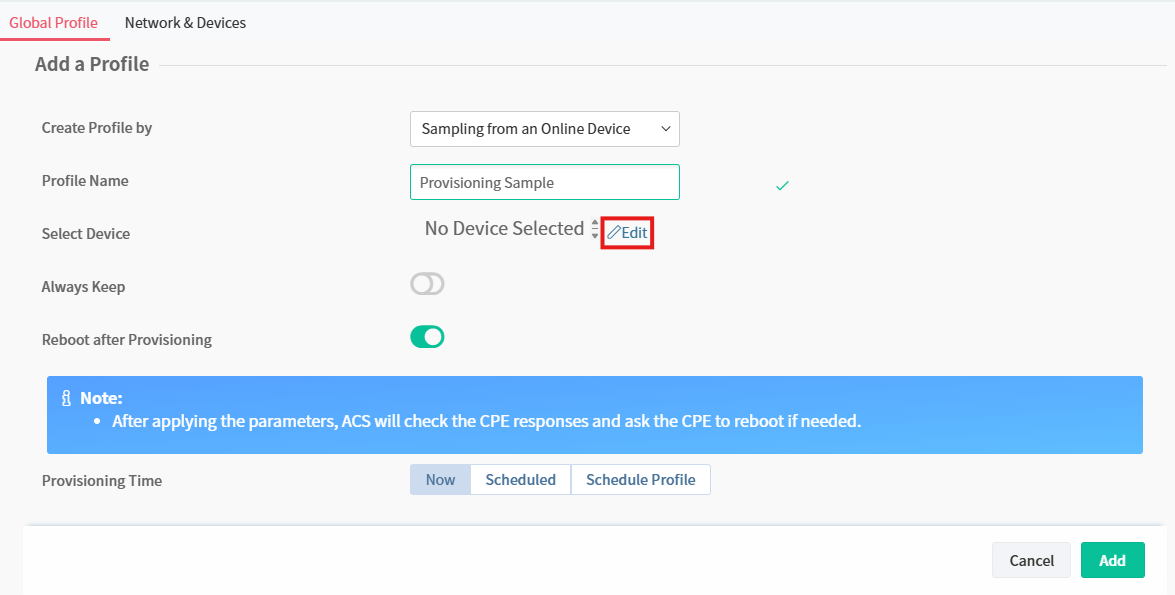
After selecting Edit, choose the online device to sample from. Devices managed by VigorACS can include routers, access points, and switches, depending on the device type and supported parameters.
Once the source device has been selected, review the profile options such as Always Keep, Reboot after Provisioning, and Provisioning Time. When the settings are correct, click Add to create the profile.
The new profile will appear in the Global Parameters list. Click Edit on the right-hand side of the profile to modify the sampled settings.

The profile opens in a Web UI-style view, allowing the required device parameters to be changed within the sampled configuration.
Make the required parameter changes. In this example, the WLAN SSID is changed so that it can be applied to other devices. Select the checkbox in the Global column for each parameter that should be included in the provisioning profile. To keep a parameter enforced, select the lock icon next to that parameter.
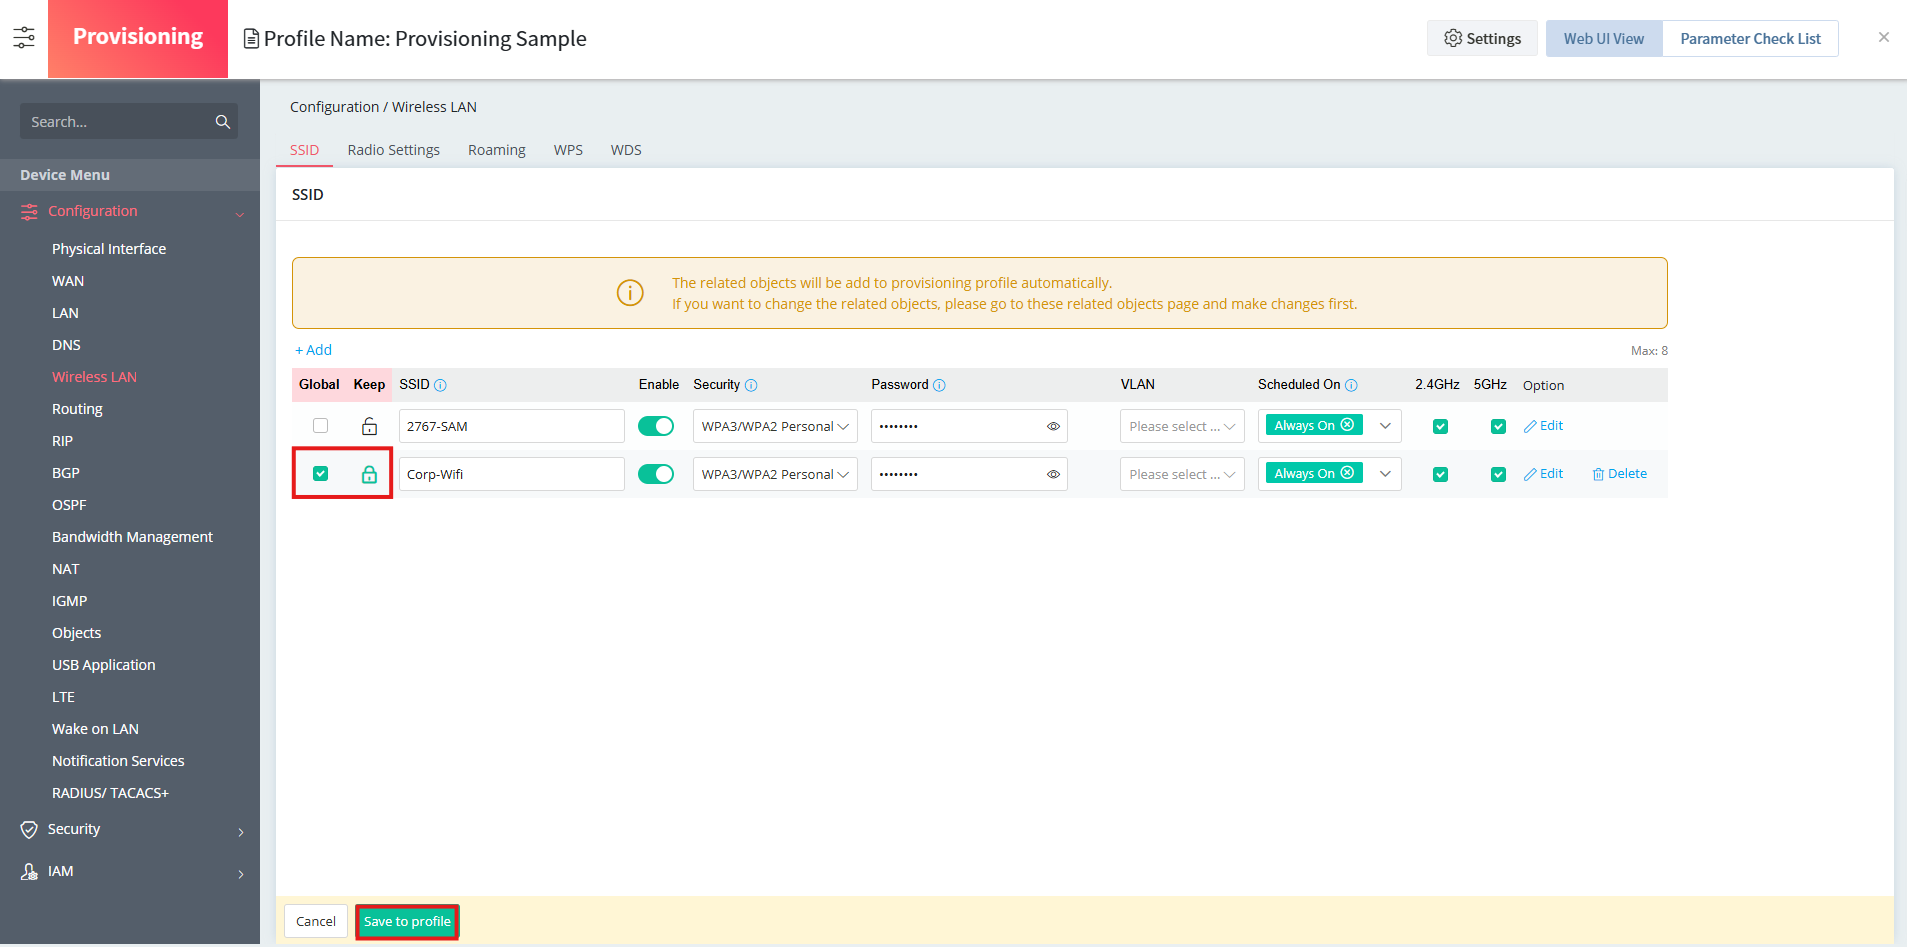
To review the selected parameters and their values, click Parameter Check List at the top-right of the screen.

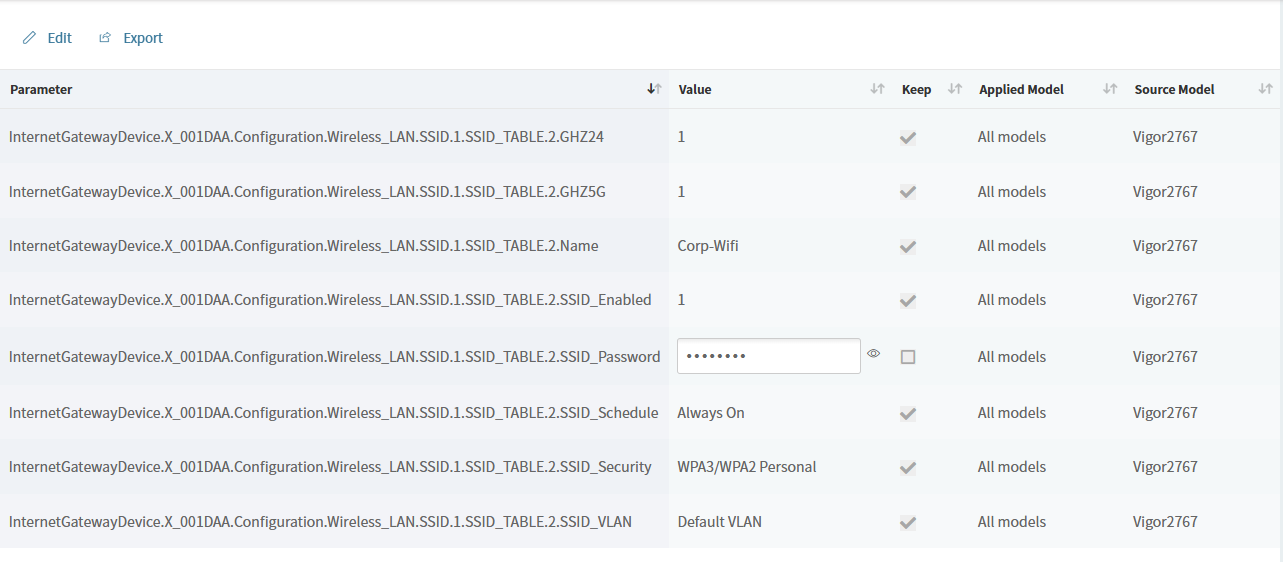
The Parameter Check List displays the parameters included in the profile and the values that will be provisioned. This provides a final check before assigning the profile to networks or devices.
Parameter names follow the device configuration path. For example, a path that includes Configuration, Wireless_LAN, SSID.1, and SSID_TABLE.2 indicates that the setting relates to SSID 2 under the Wireless LAN configuration. A parameter such as SSID_TABLE.2.Name represents the name of SSID 2.
Applying a profile to a Network or Device
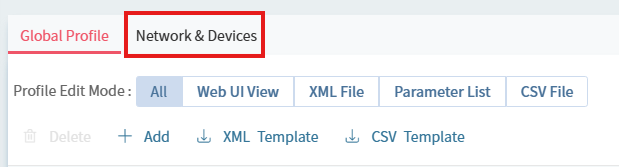
When the profile has been checked, close the Parameter Check List using the X at the top-right of the panel. To apply the profile, open the Network & Devices submenu.
Select the network or device that should receive the provisioning profile. Use the drop-down menu to choose the newly created profile, then click Save.
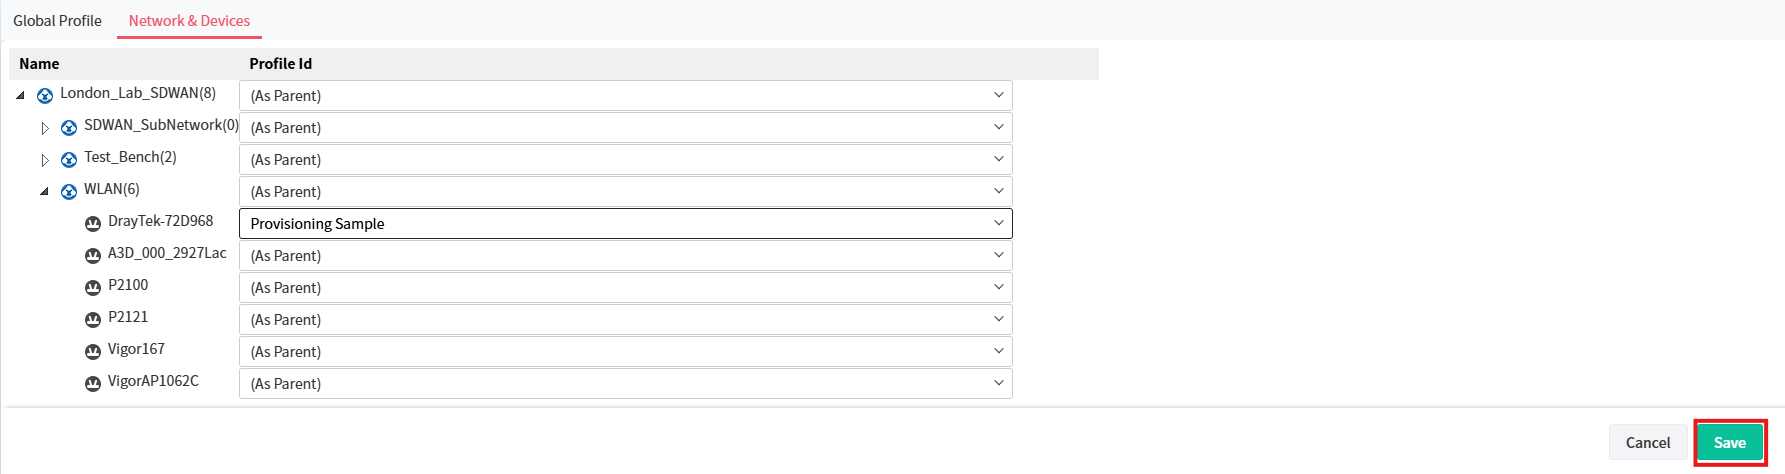
VigorACS will apply the selected parameters according to the profile settings and provisioning schedule. If a reboot is required and the option has been enabled, the device will reboot after provisioning.
Viewing logs of Profile and Device
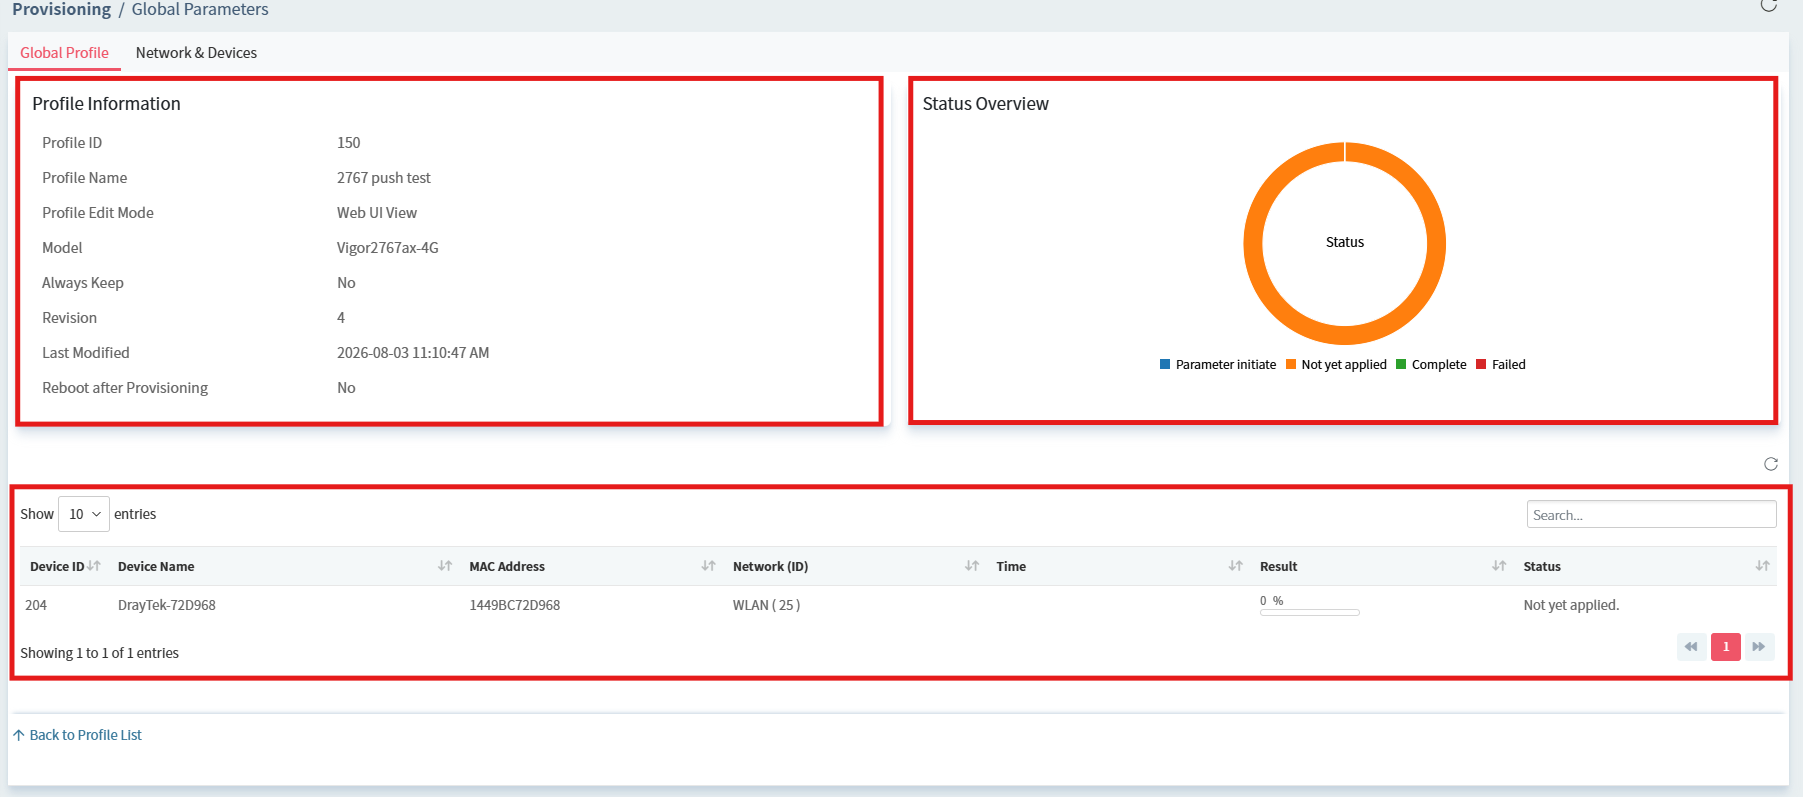
After applying the profile, you can view the status of the progress of the provisioning by clicking on “View Log” of the profile you’ve applied where you’ll be given the view below. As we can see via the image below, we have 3 boxes:
Profile Information showcasing the model the device was sampled and the number of revisions as well as the name of the profile.
Status Overview which shows us the status of all the parameters being applied and whether they have been applied or are in process of being applied to the router, whether they’ve completed and been applied successfully or failed.
The box at the very bottom of the window shows the device list as well as their name, MAC address, network, the time as well as the status and percentage result of the number of parameters applied to the device.
As we can see via the screenshot below this is what it looks like when the device is completely updated and has
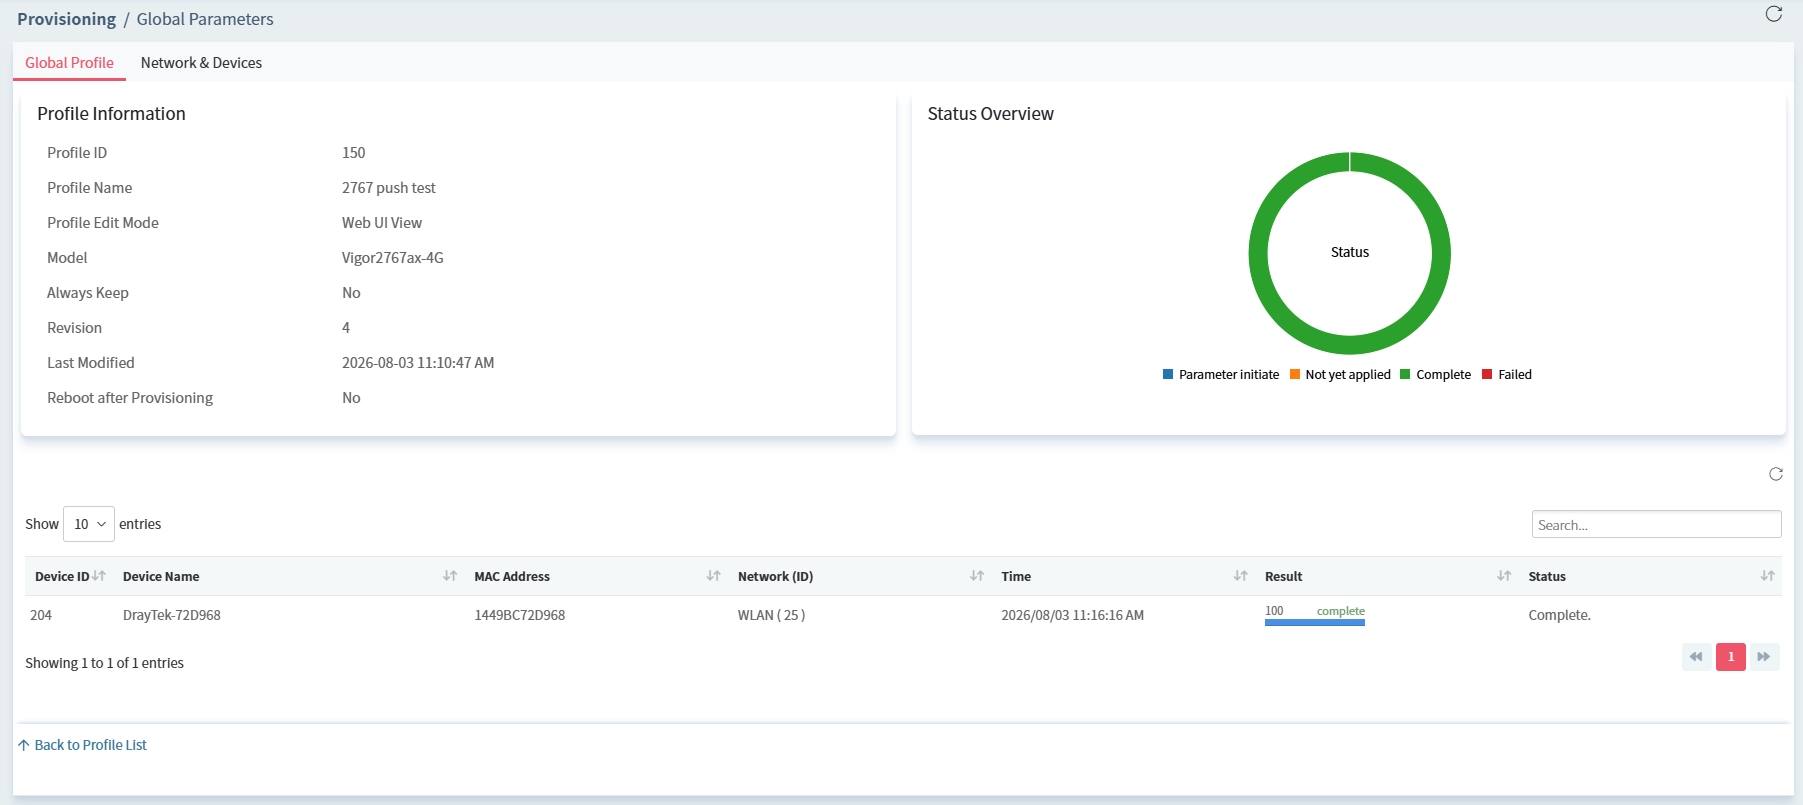
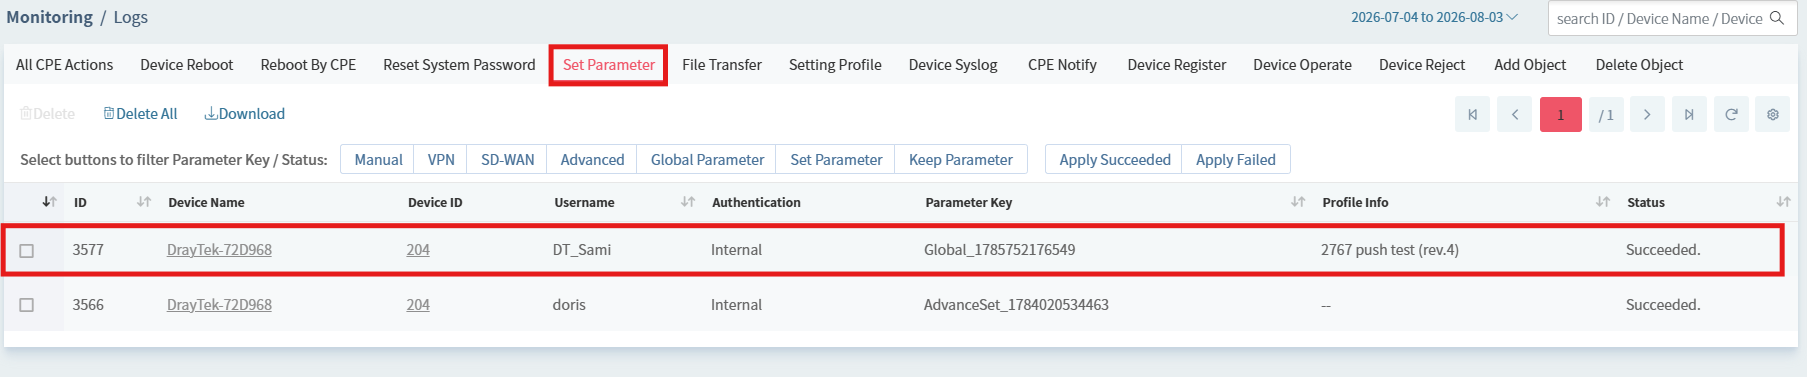
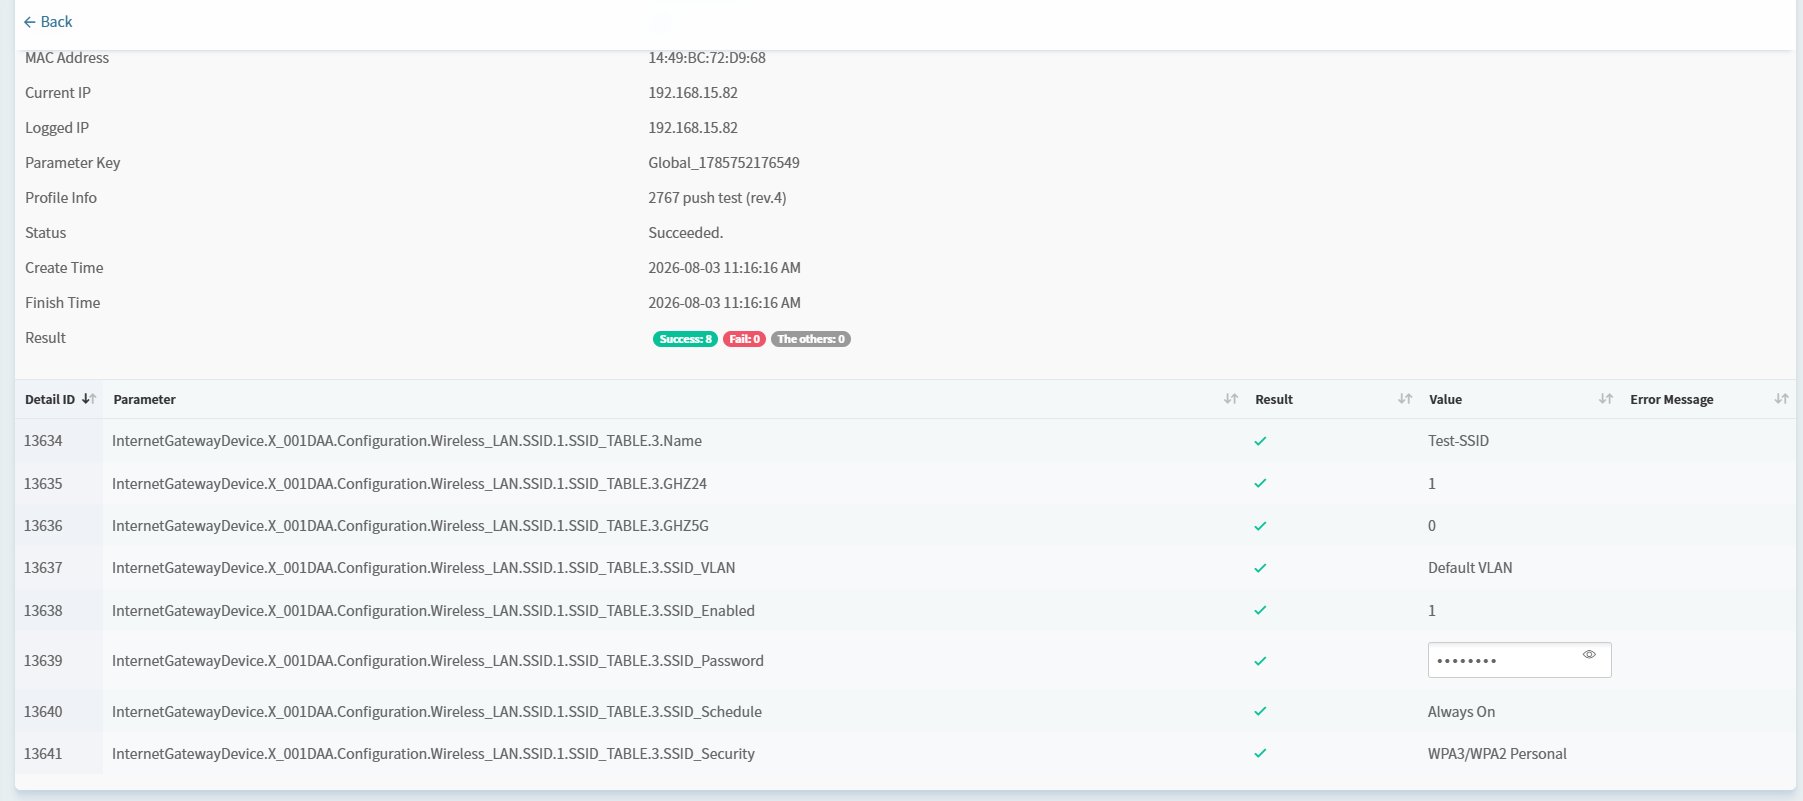
We can also check logs by going into the device, going into [Monitoring] -> [Logs] then selecting the “Set Parameter” tab at the very top and then we can view the recent Global Parameter profile created and click on it, and we can see the Parameters and their values applied and whether they were successful and which ones may have failed as well as including the date and time the parameter profile was pushed.
Add a comment to this article
NOTE : All comments are reviewed before publication and may not be posted or may be redacted if the editors do not consider them helpful. The use of offensive or obscene language, copyrighted material, or advertising or promotion or linking to any other product or service is prohibited. By submitting your comment, you confirm that you are the original author and assign copyright of the content to DrayTek indefinitely and irrevocably.
